Installation
Installing Eclipse Cyclone DDS
This publication provides detailed information about how install Cyclone DDS. The chapters will cover:
The installation and build process of Cyclone DDS core, including the C-APIs.
How to install the C++ support packages. Short C/C++, and Python tutorials are detailed to show examples of how the DDS technology is used to share data.
System prerequisites
Before building the Cyclone DDS implementation, ensure you meet all the system prerequisites. Failure to meet the prerequisites will cause the build to fail.
Supported platforms
At the time of writing this document, Cyclone DDS supports Linux, macOS, and Windows and is known to work on FreeRTOS, QNX and the Solaris-like Openindiana OS.
Software requirements
Make sure you have the following software installed on your machine:
You can obtain the dependencies to build Cyclone DDS by following the platform-specific instructions:
Install the dependencies with a package manager of your choice:
yum install git cmake gcc
apt-get install git cmake gcc
aptitude install git cmake gcc
# or others
Installing XCode from the App Store should be sufficient.
First install Visual Studio Code for the C compiler. Then it is easiest to install the chocolatey package manager.
choco install cmake
choco install git
Alternatively you might use scoop <https://scoop.sh/> to aquire the dependencies.
Note
When developing for Eclipse Cyclone DDS you might need additional tools and dependencies. See also the Contributing to Eclipse Cyclone DDS section.
Obtaining Cyclone DDS
You can obtain Cyclone DDS via Git from the github-hosted repository
git clone https://github.com/eclipse-cyclonedds/cyclonedds.git
cd cyclonedds
Building Cyclone DDS
You can build and install the required libraries needed to develop your applications using Cyclone DDS in a few simple steps, as shown below:
cd build
cmake -DCMAKE_INSTALL_PREFIX=<install-location> -DBUILD_EXAMPLES=ON ..
cmake --build . --parallel
cd build
cmake -DCMAKE_INSTALL_PREFIX=<install-location> -DBUILD_EXAMPLES=ON ..
cmake --build . --parallel
cd build
cmake -G <generator-name> -DCMAKE_INSTALL_PREFIX=<install-location> -DBUILD_EXAMPLES=ON ..
cmake --build . --parallel
On Windows you can build Cyclone DDS with one of several generators. Usually if you omit the
-G <generator-name> it will pick a sensible default, but if it doesn’t work or picks something
unexpected you can go to the CMake generators documentation.
For example, “Visual Studio 15 2017 Win64” targets a 64-bit build using Visual Studio 2017.
If you need to reduce the footprint, or have issues with the FindOpenSSL.cmake script, you can explicitly disable this by passing -DENABLE_SSL=NO to the CMake invocation. If you do not plan
on running the examples you may omit the -DBUILD_EXAMPLES=ON.
To install it after a successful build:
cmake --build . --target install
Depending on the installation location, you may need administrator privileges. The install step copies everything to:
<install-location>/lib
<install-location>/bin
<install-location>/include/ddsc
<install-location>/share/CycloneDDS
At this point, you are ready to use Cyclone DDS in your projects.
Note
Build types
The default build type is a release build that includes debugging information (RelWithDebInfo).
This build is suitable for applications because of its high-performance and debugging capabilities.
If you prefer a Debug or pure Release build, add -DCMAKE_BUILD_TYPE=<build-type> to your CMake invocation.
Installing Cyclone DDS C++ API
The Eclipse Cyclone DDS C++ API is an implementation of the DDS ISO/IEC C++ PSM API, or simply put, a C++ binding for Cyclone DDS. It is made of an IDL compiler backend that uses an IDL data model to generate their C++ representation and artifacts, a software layer that maps some DDS APIs on the Eclipse Cyclone DDS C API and direct access to the core APIs when managing data to lower overhead.
Before starting, make sure you have installed the core Cyclone DDS libraries as described above.
Obtaining Cyclone DDS C++ API
You can obtain Cyclone DDS via Git from the github-hosted repository
git clone https://github.com/eclipse-cyclonedds/cyclonedds-cxx.git
cd cyclonedds
Building Cyclone DDS C++ API
You can build and install the required libraries needed to develop your applications using Cyclone DDS C++ in a few simple steps, as shown below:
cd build
cmake -DCMAKE_PREFIX_PATH=<core-install-location> -DCMAKE_INSTALL_PREFIX=<install-location> -DBUILD_EXAMPLES=ON ..
cmake --build . --parallel
cd build
cmake -DCMAKE_PREFIX_PATH=<core-install-location> -DCMAKE_INSTALL_PREFIX=<install-location> -DBUILD_EXAMPLES=ON ..
cmake --build . --parallel
cd build
cmake -G <generator-name> -DCMAKE_PREFIX_PATH=<core-install-location> -DCMAKE_INSTALL_PREFIX=<install-location> -DBUILD_EXAMPLES=ON ..
cmake --build . --parallel
On Windows you can build Cyclone DDS C++ with one of several generators. Usually if you omit the
-G <generator-name> it will pick a sensible default, but if it doesn’t work or picks something
unexpected you can go to the CMake generators documentation.
For example, “Visual Studio 15 2017 Win64” targets a 64-bit build using Visual Studio 2017.
If you do not plan on running the examples you may omit the -DBUILD_EXAMPLES=ON.
To install it after a successful build:
cmake --build . --target install
Depending on the installation location, you may need administrator privileges. The install step copies everything to:
<install-location>/lib
<install-location>/bin
<install-location>/include
<install-location>/share/CycloneDDSCXX
At this point, you are ready to use Cyclone DDS in your projects.
Note
Build types
The default build type is a release build that includes debugging information (RelWithDebInfo).
This build is suitable for applications because of its high-performance and debugging capabilities.
If you prefer a Debug or pure Release build, add -DCMAKE_BUILD_TYPE=<build-type> to your CMake invocation.
Installing Cyclone DDS Python
Binaries or from source
The Cyclone DDS Python API requires Python version 3.7 or higher, with 3.11 support provisional. The wheels (binary archives) on PyPi contain a pre-built binary of the CycloneDDS C library and IDL compiler. These have a couple of caveats. The pre-built package:
Does not provide support for DDS Security,
Does not provide support for shared memory via Iceoryx,
Comes with generic binaries that are not optimized per platform.
If you need these features, or cannot use the binaries for other reasons, you can install the Cyclone DDS Python API from the source.
You will need to set the environment variable CYCLONEDDS_HOME to allow the installer to locate the Cyclone DDS C library if it is not on the PATH.
At runtime, we leverage several mechanisms to locate the appropriate library for the platform. If you get an exception about non-locatable libraries,
or wish to manage multiple Cyclone DDS installations, you can use the environment variable CYCLONEDDS_HOME to override the load location.
Installing from PyPi
Install with pip directly from PyPi.
pip install cyclonedds
Installing from source
You can install it from the GitHub link directly:
CYCLONEDDS_HOME="<cyclonedds-install-location>" pip install git+https://github.com/eclipse-cyclonedds/cyclonedds-python
Installation remarks
Environment variable updates on Windows
To run Cyclone DDS executables on Windows, the required libraries (like ddsc.dll) must be available to the executables.
Typically, these libraries are installed in system default locations and work out of the box.
However, the library search path must be changed if they are not installed in those locations. This can be achieved by
executing the following command or going into the “Environment variables” Windows menu.
set PATH=<install-location>\bin;%PATH%
Note
An alternative to make the required libraries available to the executables are to copy the necessary libraries for the executables’ directory. This is not recommended.
Test your installation
To test if your installation and configuration are working correctly, you can use the Cyclone DDS ddsperf tool or you
can use the Hello World! example. To use ddsperf you skip ahead to testing your network configuration..
Running the Hello World! example
Eclipse Cyclone DDS includes a simple Hello World! application that can be executed to test your installation. The Hello World! application consists of two executables:
HelloworldPublisher
HelloworldSubscriber
The Hello World! executables are located in <cyclonedds-directory>\build\bin\Debug on Windows, and
<cyclonedds-directory>/build/bin on Linux/macOS. Please note that you did not run CMake with -DBUILD_EXAMPLES=ON earlier the executables will be missing.
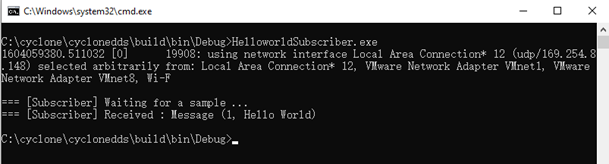
To run the example application, open two console windows and navigate to the appropriate directory in both console windows. Run HelloworldSubscriber
in one of the console windows:
./HelloworldSubscriber
./HelloworldSubscriber
HelloworldSubscriber.exe
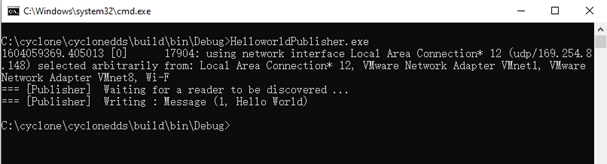
Run HelloworldPublisher in the other console window using:
./HelloworldPublisher
./HelloworldPublisher
HelloworldPublisher.exe
HelloworldPublisher appears as follows:
HelloworldSubscriber appears as follows:
Note
The default behavior is automatically detecting the first network interface card available on your machine and using it to exchange the hello world message. Therefore, selecting the correct interface card is essential to ensure that your publisher and subscriber applications are on the same network. This is a common issue with multiple network interface cards on machine configurations.
You can override this default behavior by updating the property //CycloneDDS/Domain/General/Interfaces/NetworkInterface[@address]
in a deployment file (e.g. cyclonedds.xml) that you created to point to it through an OS environment variable named CYCLONEDDS_URI.
See also the Configuration Guide and the Configuration File Reference.
Uninstalling
You can manually remove the install and build directory.
rm -rf cyclonedds
rm -rf <install-location>
rm -rf cyclonedds
rm -rf <install-location>
Navigate to your install location and remove the Eclipse Cyclone DDS folder.
Want to know more about DDS?
The primary source of information is the OMG website at http://www.omg.org, specifically the DDS Getting Startedpage and the DDS specification.